
How To Create Movies on Your openMosix Cluster
by Matt Rechenburg
Overview
introduction
requirements
modeling a scene
animating the scene
rendering the pictures
merging the pictures to a movie
helpful links
Todays movies are heavy augmented or even completely created by the help of huge computer system which let "movie-makers" create own special effects in artificially created three dimensional worlds. Masses of photo-realistic 3D picture data has to processed to generate those animations- or movie files since every pixel's color, shining, shadow and reflection has to be calculated according to the given light and camera position. This is called raytracing or rendering.
To speed up those image-rendering big clusters are used. The purpose of this howto is to give an introduction and first guide how to create your own animations and movies on your openMosix cluster.
a running openMosix cluster
Assuming that you have an openMosix cluster already up and running you will now need several additional programs to create, render, and image files, to convert those files and to merge image files to a movie or animation file.
software used
Here is a list of software used in this tutorial :
KPovModeler
Povray 3.1
tgatoppm, ppmtojpeg, ppm2fli, ppmtompeg, sampeg, convert, mpeg.
(please notice that not all converters are required, they are just listed because it is useful to "play" a bit with each of them to see how to get the best quality out of the rendered images)
I am using KPovmodeller for this tutorial because it is very easy to learn and gives a faster "feeling of success" for creating the first 3D scenes. You may choose any other modeling program which is able to export povray-files.
In this howto I will describe how to create movies/animations using "povray" but you may also use any other preferred rendering engine. BTW: I am (still) using Povray 3.1. It is known to work very well and is stable (and because of some license issues).
You will find links to the download location of the programs listed above in the helpful links sections of this document.
Install the required software on one of your nodes which is part of the cluster. (there is no need to install the additional software on all nodes of the cluster since openMosix is a SSI-clustering system)
For generating a self-made movie you first have to create a 3D-world and fill it with objects of your choice, in short: you have to model a scene. You can also start directly by opening some example scene provided by KPovModeler but I really suggest to start your own scene to get more familiar with the construction of objects in the 3D world.
Just follow the basic kpovmodeler tutorial to create you first scene.
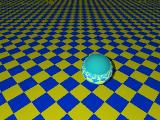
You can already render your "created world" by using the render-button in KPovModeler.
(be sure to have it configured correctly in the rendering-settings dialog)
It will render and display the image from the first pov-file of the scene you created.
(an example image from the basic tutorial)
The next section describes how to animate this scene.
regular povray animation feature
Povray provides an animation support itself by counting up a "clock" variable in inside the povray-file. It accepts additional commandline parameters (please see "man povray") to set the initial values for this clock variable and e.g. frames to use. Inside the povray-source code this variable can be used to dynamically e.g. move, resize or turn objects inside the scene. A more detailed description how to use this for animating scenes can be found at : The Clock Variable
how we animate the scene
Why use another mechanism for animating scenes? Because if the common povray-animation feature is used it will produce just one pov-file which then renders each image sequentially and since we want to speed-up this cpu-intensive computation by using our cluster we have to find a better way to parallelize this.
We need to have each povray-file with the correct object position for the whole scene. Then we can give those files (in packages) to the cluster to gain the most advantage and to save time. This will be explained in detail in the rendering the pictures section.
We will start now with the first scene of the (hopefully) finished KPovModeler tutorial from the above section modeling a scene
and make the "ball" move/roll across the "ground" a bit.
Here is how to create this simple animation and the needed povray-files:
1) save the created scene from the KPovModeler tutorial
2) export the scene as "povray-file" (file-menu) to a separate directory. e.g. /usr/local/makemovie/data/animation0000.pov
Please give a "huge" number in the file-name for the exported povray-file starting with 0000.
3) now click on the "sphere" and change the X-position value from 0 to 0.1 (you will see the sphere moving a small bit to the right).
4) export the changed scene again as a "povray-file" named "animation0001.pov"
5) repeat step 3) + 4) as often as you want (and as you can still see the sphere)
For smaller animations this method is acceptable, for bigger movies I seriously suggest to use some quick "bash magic" and "sed-hacks" to change the according
variables in the povray-files source code easily.
You should create at least 5-10 povray files for the latter animation.
Assuming that we have several povray-files from the scene we can now start to render them into images for merging them together into the resulting animation.
Using an openMosix cluster we can simply start more than one povray-renderer in parallel. Each of those povray processes will work on producing one frame/image.
For this we do not need any big queuing system but just a simply for-loop in a shell script (you can download this script here makemovie.tar.gz
).
This script just starts packages of povray processes according to the given process-count value e.g.
makemovie 10 [image-base-name]
starts 10 povray processes and when the 10 processes are finished it will start
the next batch of 10 processes.
The [image-base-name] is the povray-file name without the number and .pov extension.
(sure this can be optimized but for my current purposes it is more than enough and keeps my cluster busy)
To make it easy for you to start I put everything needed in a makemovie.tar.gz file which you can download and untar+unzip in /usr/local (static paths in the script).
This tar-ball contains also a few povray-files + the KPovModeler tutorial project file. You can either directly start and use the few example povray-files or open the KPovModeler tutorial project file (in /usr/local/makemovie/data/) and use this to create your own pov-files.
After you untarred+unzipped this package in /usr/local you can follow the commands below to render all needed images and create the first mpeg/fli animations and movie files:
cd /usr/local/makemovie
./makemovie 5 pov-tut
This will run povray on the existing povray-files in /usr/local/makemovie/data, (just put your povray files with the correct numbering there later) using 5 processes, create all images, convert and merge them together into a mpeg (or fli) file using diffrent mpeg-converters and animation utilities.
You will find the resulting mpg/fli files in /usr/local/makemovie/movie/.
The rendering process will be automatically distributed by the openMosix load-balancing and transparent process-migration and you will notice a huge speed-up depending on how many cluster-nodes are being used :)
The "merging" procedure will be explained in the next section.
generating mpeg files:
There are some more different utilities for merging a sequence of images into a mpg-file. The above mentioned "makemovie" script uses several different converters and mpg-utilities to create different "versions" of the resulting movie.
Please pick the procedure which produces the best quality output files for you.
(you have to test, as I experienced it depends also on the mpg-player you use for viewing them)
Here a few execution examples of some various mpg-tools:
Using ppmtompeg:
Using ppmtompeg requires a configuration file which can be easily created using the "generate-ppmtompeg" script which is included in the makemovie.tar.gz file. The syntax then is:
ppmtompeg [config-file].pf
Using sampeg:
sampeg --format=jpeg --input=[image-base-name]%04d.jpg -r1.5M --force -o [image-base-name].mpg
Using convert:
convert -quality 100 *.tga [image-base-name].mpg
Using tga2mpg:
This is a little perl script I found on the Internet which does a good job using the Berkeley MPEG Encoder.
tga2mpg [image-base-name] [wide] [height] *.tga
Using ppm2fli:
ppm2fli -g[wide]x[height] [image-file-list] [image-base-name].fli
using in webpages:
Sure the images generated/rendered from the povray-files can be used for smaller gif-animation on web-pages too. You just need to create/convert smaller pictures and sample them all together using your favorite gif-animation tool (e.g. gimp, gifmerge...)
the makemovie script(s):
http://www.openmosixview.com/makemovie/makemovie.tar.gz
raytracing:
http://www.povray.org/documentation/view/4/
raytracer:
povray:
http://www.povray.org
( 3.x version at ftp://ftp.povray.org/pub/povray/Old-Versions/ )
povray 3.1 rpm
ftp://rpmfind.net/linux/redhat/6.2/en/powertools/i386/i386/povray-3.1g-1.i386.rpm
coolray
http://www.coolray.org/
rendview
http://www.cip.physik.uni-muenchen.de/~wwieser/ani/rendview/
yafray (Yet Another Free RAYtracer)
http://www.yafray.org/
BMRT (Blue Moon Rendering Tools, no longer being distributed!!)
Blue Moon Rendering Tools
3delight
http://www.3delight.com/
mpeg-converting/merging:
sampeg
http://rachmaninoff.informatik.uni-mannheim.de/sampeg/
The Berkeley MPEG Encoder (even parallel)
http://bmrc.berkeley.edu/frame/research/mpeg/mpeg_encode.html
ImageMagick
http://www.imagemagick.org/
modeler:
kpovmodeler
http://www.kpovmodeler.org/indexde.html
blender
http://www.blender.org
3dpm
http://w3studi.informatik.uni-stuttgart.de/~kraftts/
giram
http://www.giram.org/
moonlight
http://moonlight3d.net/
Ayam
http://ayam.sourceforge.net/
openMosix
http://openmosix.sourceforge.net/
This tutorial does not claim to be complete but it should give you a first idea how to improve rendering speed for creating nice 3D animations on your openMosix cluster.
In the case I forgot serious information or if you have any questions about the explained topic feel free to mail/ask me.
Matt Rechenburg (mosixview@t-online.de)

This page is: http://www.openmosixview.com/makemovie/
